
EKP Online Help for Users
Search Using an Advanced Search
In EKP you can search for a learning module or program using an Advanced Search that lets you narrow the search to specific areas of the EKP database.
To perform a search using an Advanced Search,
1. Click on Advanced Search in the top right of the Search Catalog screen. The Advanced Search screen appears.
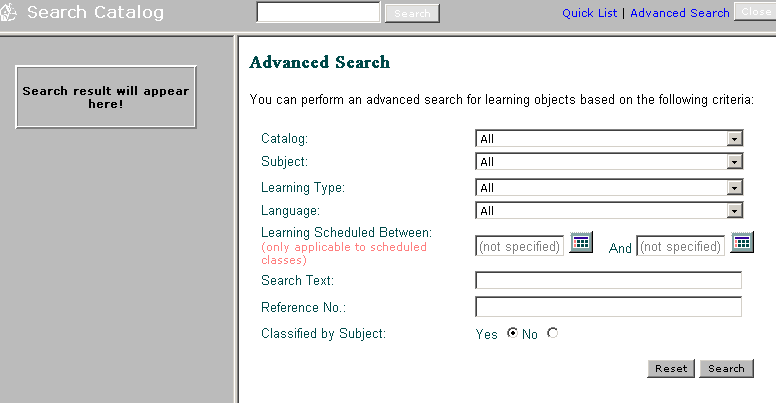
Select the area(s) in which you want EKP to perform a search.
2. To search within a particular catalog, click on the q box button next to the Catalog field.
3. From the drop down menu that appears, click on your preferred display preference.
4. Click the Search button if you do not wish to enter other search criteria. Otherwise proceed to the next step.
5. To limit your search to a particular Learning Type, click on the q box button next to the Learning Type field.
6. From the drop down menu that appears, click on your preferred display preference.
7. Click the Search button if you do not wish to enter other search criteria. Otherwise proceed to the next step.
8. To locate courses conducted in a particular language, click on the q box button next to the Language field.
9. From the drop down menu that appears, click on your preferred display preference.
10. Click the Search button if you do not wish to enter other search criteria. Otherwise proceed to the next step.
Date Range: To locate learning types/modules/programs scheduled within a particular date range, go to the Learning Scheduled Between fields.
To specify a range of dates, first select the Beginning date.
a. Click the date icon.  A
separate calendar date selection window appears.
A
separate calendar date selection window appears.
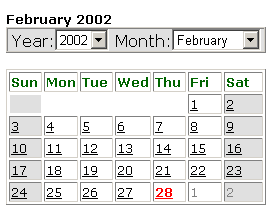
b. Choose the year. Click on the q box symbol next to the year field, then
c. Click on the desired selection from the drop down list that appears.
d. Choose the month. Click on the q box symbol next to the year field, then
e. Click on the desired selection from the drop down list that appears.
f. Click on the desired day.
The date is now copied to the Beginning Date field.
Select the Ending date.
Note that if you do not specify an ending date, the system will default to the current date.
a. Click the date icon. A
separate calendar window appears.
b. Choose the year. Click on the q box symbol next to the year field, then
c. Click on the desired selection from the drop down list that appears.
d. Choose the month. Click on the q box symbol next to the year field, then
e. Click on the desired selection from the drop down list that appears.
f. Click on the desired day.
The date is now copied to the Ending Date field.
12. Click the Search button if you do not wish to enter other search criteria. Otherwise proceed to the next step.
13. Enter the name of the item in the Search for Learning Item field.
Wild Card Search: You may either type in the full name or part of the name followed by a ' * ' For example, to search for items staring with the letter 'R' you would enter ' R* '
14. Enter the reference number in the Reference No. field.
15. Choose whether you wish to classify results by subject or not.
16. Click the Search button. The results appear in the Results Area on the left.
If you chose to classify items by subject, the results will be grouped by subject:
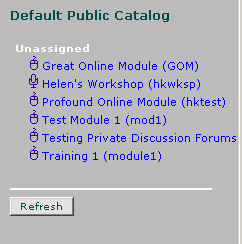
If you chose NOT to classify items by subject, the results will not be organized by group:
To retrieve more information about a particular learning object/program/module, click here.
Note: Due to changes in the application software, resulting from:
Customization
Changes to your preferences
Changes to the report set up
Access rights granted to you by your Systems Administrator or
Upgrade work
the menu screens depicted may be different from the ones on your system. Click here to read the full disclaimer